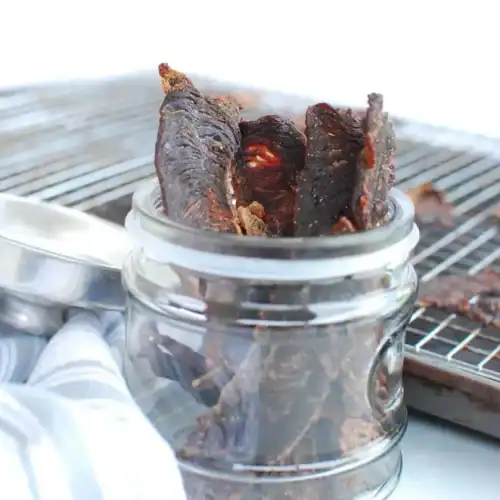
This homemade low-carb keto beef jerky recipe is going to be your new favorite keto snack! While many store-bought brands of jerky come with quite a bit of added sugar, this version clocks in at just over 1 gram of net carbs per serving. It’s a great way to satisfy a salty craving and give your body high-quality protein. Plus, it’s all made in a standard oven – no dehydrator necessary!

WHY MAKE YOUR OWN KETO BEEF JERKY?
Many store-bought Beef Jerky options contain more carbohydrates than you’d probably like while on a keto diet. For example, most popular jerky brands at the supermarket range from 6 to 9 grams of carbohydrate per serving. When you’re trying to stay around 20 grams or less of net carbs per day, that’s a lot!
Making it yourself allows you to better control the ingredients, limiting sugar and keeping the carb count in check.
START WITH A GOOD CUT OF BEEF
If you’ve never made homemade jerky before, don’t feel intimidated. It’s actually really simple, but just takes a bit of time.
You’ll start by choosing the beef you’re going to use. I highly recommend using Pre Top Sirloin Steak for this jerky. All of is ethically sourced, and the cattle graze on pasture throughout their lifetime. It’s fully grass-fed and grass-finished beef.
Because of this, the result is a leaner sirloin steak. While this sounds counterintuitive on a keto diet, it’s really important for this recipe!
First, you need leaner cuts of beef to make jerky. Fatty cuts will cause the jerky to go rancid quicker.
Second, the type of fat that’s in the meat is more optimal. It has more CLA (conjugated linoleic acid – a type of fatty acid) and more omega-3s compared to grain-finished beef. I love the idea of getting a healthier fat profile in meat.
If you want to grab some of the beef from Pre to make this recipe (along with stocking up on some other cuts of beef for weeknight meals!), you can actually score a discount with our special code. Use code YUMMYKETO to get 20% off orders of $125 or more with free shipping! As a heads up, this is valid for new customers and is only valid on your first order if you’re subscribing.

HOW TO MAKE YOUR BEEF JERKY
Now that you’ve got your top sirloin, you’ll go ahead and slice it thin – about 1/4 to 1/8 of an inch. Generally, it’s best to slice against the grain. This will help make the jerky more tender and easier to chew. It is personal preference though; if you prefer chewier jerky you can slice with the grain.
If you have trouble slicing the meat thin, one trick is to keep it partially frozen when slicing. For example, when I defrost the Pre Top Sirloin in the fridge, I’ll pull it out before it’s completely defrosted to cut. This usually helps you get thinner slices.

After you’ve got it sliced, it’s time to make your marinade. For this keto beef jerky, here’s what I’ve used:
- Soy sauce
- Lakanto Golden (or another keto brown sugar substitute)
- Apple cider vinegar
- Liquid smoke
- Pepper
- Salt
- Garlic powder
- Onion powder
I know there are different schools of thought on soy sauce and the keto diet. Some people will say it’s not truly keto because it contains wheat and sugar. However, these amounts are extremely small and soy sauce contributes very little as far as carbs in a marinade like this. We are firm believers that ketosis is a metabolic state, not a list of hard-and-fast rules, and as such use soy sauce in this marinade.
If you are not comfortable using soy sauce, though, you can use liquid soy aminos. This is a non-fermented salty soy seasoning without any wheat.
You can also use coconut aminos. However, keep in mind that coconut aminos generally contain more carbs than soy sauce or soy aminos. For example, 1 tablespoon of coconut aminos contains 6 grams of carbohydrate, while 1 tablespoon of soy sauce contains about 0.5-0.8 grams of carbohydrate.
Alright, moving on – after you’ve got your marinade mixed up, you’ll toss your beef in there (a zip top bag or medium food storage container works well). Let that sit in the fridge for at least a couple of hours, or overnight.

Now you’re ready to go ahead and make your jerky! You’ll start with a pre-cooking step (see the food safety tip below) and then dehydrate it for a couple of hours – all in a standard oven. When it’s done, you’ll love this chewy, salty, high-protein snack!
FOOD SAFETY RECIPE TIPS
Many online beef jerky recipes simply call for marinating the meat then cooking it at a low oven temperature. This definitely results in an amazing texture.
However, my wife is a nutritionist and a stickler for food safety – and she dug up the USDA recommendations for homemade jerky when I started making my own. The USDA recommends that meat is heated to 160 °F prior to drying, in order to kill any dangerous bacteria.
Apparently, when you dehydrate meat without first bringing it to this temperature, the bacteria can become more heat resistant and survive the process. This can potentially lead to foodborne illness.
JERKY COOKING TIPS
As such, I’ve modified my method to include the pre-cooking step for optimal food safety. Some people choose to pre-cook by simmering on the stovetop, but I’ve found the texture to be much better with an oven-based pre-cook.
All you need to do is cook the beef in the oven at 300°F until the meat hits 160°F, then you’ll quickly reduce the oven temperature to start dehydrating it. Depending on your oven type and air flow, this can take anywhere from 10 to 20 minutes.
The best way to determine if the pre-cook phase is done is by using an oven-safe thermometer probe. Ideally, use one that has a receiver so you can see the temperature outside the oven. Wrap a piece or two of the meat tightly around the thermometer probe, and then you’ll be able to see when it’s at the correct temperature and you’re ready to move on to dehydrating it.

KETO BEEF JERKY RECIPE FAQ
Here are some common questions that may come up as you prepare this recipe:
I really love the way Pre Top Sirloin works in this keto beef jerky recipe – seriously, the quality is incredible. But if you don’t have that on hand, eye of round, top round, bottom round, or flank steak will all work.
There’s no hard-and-fast rule on determining this, but here’s a quick trick you can use: Pull a piece from the oven if you think it might be done, and the bend it in half. If moisture comes out, it needs more time. If it cracks in half immediately, it’s overdone. If it’s pliable without any moisture seeping, and the meat fibers stretch or separate a bit when bending, it should be done!
According to the USDA, home-dried jerky can be kept for 1-2 months. While properly dried beef jerky should be shelf-stable, it can be tough when starting to know if the moisture level is correct. As such, I’d recommend storing your jerky in the fridge instead of at room temperature.
Homemade jerky is typically lower in moisture than store-bought brands (due to the limitations of processing it at home and the steps to keep it food safe). As such, an ounce of homemade jerky may contain more overall beef by weight, and thus have more protein by weight compared to an ounce of store-bought jerky.

I hope you enjoy this keto jerky! If you get a chance to try it, please feel free to leave a recipe rating or comment below.

Homemade Beef Jerky Keto Snack Recipe
Ingredients
- 1 pound Pre Top Sirloin Steak
- 1/4 cup soy sauce (or liquid aminos or coconut aminos)
- 1 tbsp keto brown sugar
- 1 tsp apple cider vinegar
- 1 tsp liquid smoke
- 3/4 tsk pepper
- 1/2 tsp salt
- 1/2 tsp garlic powder
- 1/2 tsp onion powder
Instructions
- Trim any visible fat from the top sirloin steak. Slice beef into thin strips, about 1/8 to 1/4-inch thickness, cutting against the grain.

- In a zip-top bag or medium food storage container, mix all the remaining ingredients to make the marinade. Toss the beef in the marinade. Place in the refrigerator and let the meat marinate for at least 3 hours, or overnight.

- When finished marinating and ready to continue, preheat the oven to 300 degrees F. Prepare two baking sheets each with an oven-safe rack.
- Remove the meat from the fridge. Lay the strips of beef on the racks. Wrap one piece of beef tightly around an oven-safe meat thermometer probe.
- Place both baking sheets in the oven (adjust oven racks if needed to accommodate one on the bottom middle and one on the top middle). Heat for about 15 minutes, or until the thermometer in the meat reaches 160 degrees.
- When the meat hits that temp, crack open the oven door for a minute (to let some heat escape) and reduce the oven temperature to 170 degrees. Close the oven door.
- Continue dehydrating the meat for about 2 to 4 hours, or until it reaches the proper texture (total time will depend on the thickness of the meat and your oven). Start checking for doneness around 2 hours. When done, remove from the oven and enjoy.


Leave a Comment